![]() Design & Tech CAD
Design & Tech CAD
Views
Detailing
GA's and BOM
BOM -
Sub Asm
Explode States
Spline curves
Printing
3D Data Standards
Adding Drawing Views – [RMB menu]
The first view must be a general view. Use the Drawing View dialogue box to set up your first view.
Your first view will probably be an orthographic view. Either use the list of saved views [from the model] to set its orientation or orientate the view manually using the Geometric References or Angles options.
Make sure you set a view scale to make best use of the sheet area.
Double-click a view to change its properties.
Other views such as, Detailed views, should be added through the Insert > Drawing View drop down menu.
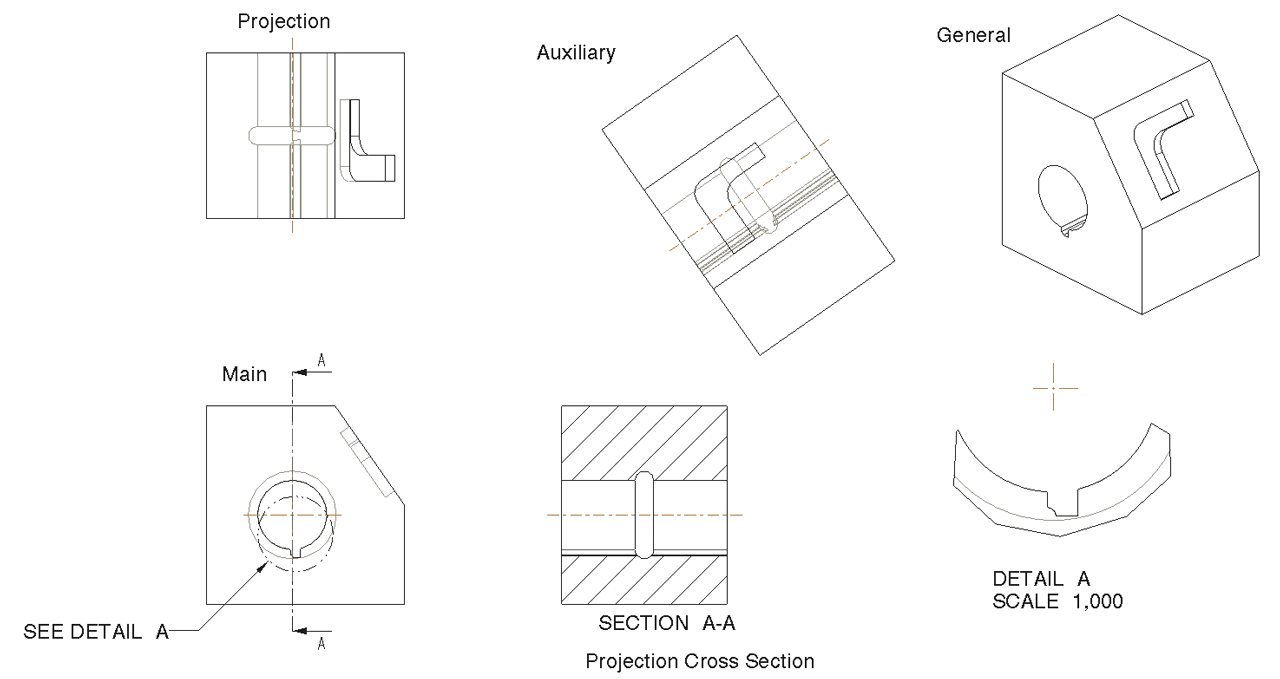
Types of Views
The primary view types available in the VIEW TYPE menu (illustrated in figure below) are:
- General – A view that you orient and is not dependent upon any other view for its orientation.
- Projection – An orthographic projection of an object as seen from the front, top, right, or left. First or third angle?
- Auxiliary – A view created by projecting 90 degrees to an inclined surface, datum plane, or along an axis.
- Detailed – A view that you create by taking a portion of an existing view and scaling it for dimensioning and clarification purposes. The boundary for the detailed view can be a circle, ellipse (with or without a horizontal or vertical major axis), or a spline.
Click above image for bigger picture
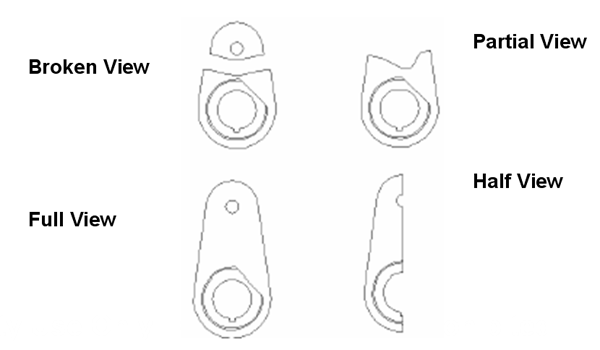
Specifying How Much of the Model Is Visible
Using other options in the View Properties > View Type window, you can specify how much of the model is visible in the view, as shown in the next figure.
- Full View – Shows the entire model.
- Half View – Shows only the portion of the model on one side of a datum plane.
- Broken View – Removes sections from large objects between two points and moves the remaining sections close together.
- Partial View – Shows only the portion of the view that is contained within a boundary.
Adding a Cross Section
A cross sectional view is often needed to clarify internal detail – remember, never dimension hidden detail, dimension the cross section. A perpendicular datum plane in the parent view is used as the ‘cutting’ plane to allow a projected view to be showed in Cross Section [xsec]
To show the view as a cross-section, use the View Properties> Sections window options. Either pick an existing xsec (which should be created in the model file - see HERE) or create a new planar section.
Adding section arrows
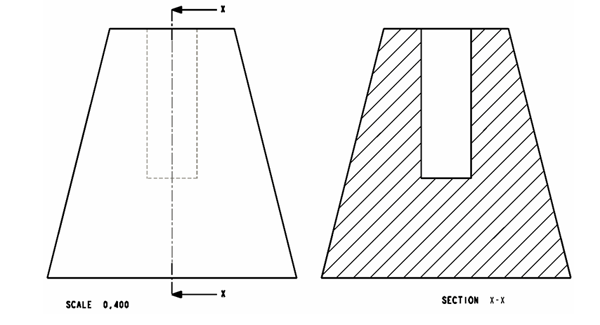
Arrows are needed in the parent view to show the position of the cutting plane. Pick the xsec view > RMB and choose add arrows > choose the view to which to add the arrows.
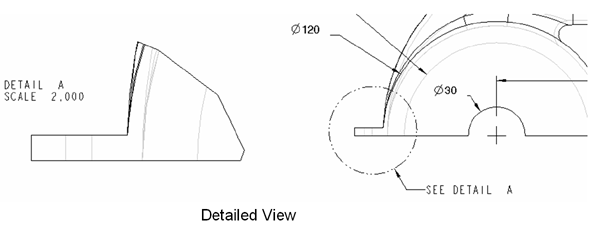
Adding a Detailed View
-
Insert > Drawing View > Detailed View
-
Pick a point on the part to show the centre of the detailed area
-
You are prompted to draw a spline curve to represent the extents of the detailed area
DON'T start the spline tool from the sketch toolbar, just start picking points to show the area. -
Middle mouse button to finish the spline
-
Pick a position to place the view
-
Change the scale accordingly
Isometric View
An isometric view can help us better visualise the 3D form. Use the orient view icon in the part file to create an appropriate view or the view orientation area of the view properties dialogue box to create your view. Rotate around the vertical axis 45 degrees, rotate around the horizontal axis 35 degrees.
Videos
General orthograpic view - HERE
Isometric vew - HERE
Cross Section (x-sec) view - HERE
Detailed view - HERE
Line display
The settings wireframe, hidden line, no hidden line or shaded will affect the way your view are displayed. Showing hidden detail is the preferred option, but if this makes the view unreadable because of an extreme amount of internal detail then use no hidden line – make sure you are consistent in any associated views
The line display setting can be controlled independently within each view through the view properties window. Isometric views are generally not shown with hidden line detail, their main function is to show the general form.
Multiple parts on single sheet
If you want to split your sheet into areas and details multiple parts then:
File > Properties > Drawing Models > Add Model
Then use the Set Model option to switch active models. Make sure you split up your sheet and have a details table for each model.
Multiple Sheets
If you cannot include enough adequately sized views on a sheet to fully explain your model then add sheets to the engineering drawing:
Insert > Sheet
Fill in the table info as before. Use the box in the top toolbar to switch between sheets.
“wysiwyg”
What you see, is what you get – your file will print as it is shown on screen. Turn off display of reference geometry [planes and csys], switch to hidden line. Always do a test print and then fine tune the drawing. Although hidden lines show in grey on the screen they will print as the standard dashed lines.
Watch the ProE print
defaults. When you hit the
![]() print
icon, the system should be configured to print ‘Full Plot’, that
is, 1:1. If it doesn’t then your scale will be incorrect. Change the
setting in the ProE print window – Configure > Model > Full Plot
print
icon, the system should be configured to print ‘Full Plot’, that
is, 1:1. If it doesn’t then your scale will be incorrect. Change the
setting in the ProE print window – Configure > Model > Full Plot
Show the associativity between the drawing the and the model file.
If you open and modify the file to which your drawing is associated and then regenerate the drawing file it will be updated according to those changes.
Once you have applied dimensions to the drawing these can also be used to change the part file.
Deleting unwanted lines
Common situation is when you have a mirrored part with normalcy across the symmetry plane or merged surface patches at G2/curvature continuous - this will create tangent/patch edges which shouldn't be there as there is no abrupt change in radius.
Also, stray, random lines can be created if the system cannot fully resolve the geometry.
View > Drawing Display > Edge Display > Erase Line