![]() Defining and Setting Appearances
Defining and Setting Appearances
Appearances can be set at the part or assembly level;
If you apply appearances in the assembly they do not show when you open the part file
Appearances applied in the assembly override appearances applied in the part
![]()
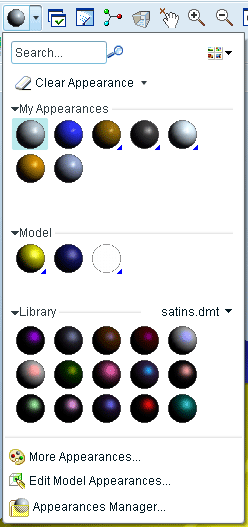
The Appearance Gallery accessed through the top toolbar is split into three areas;
 |
My Appearances:
your created or chosen appearances |
| Model:
appearances currently applied to the model |
|
| Library:
database of predefined appearances. Use the drop down arrow to
access different appearance sub sets |
|
| Edit Model Appearances:
change appearance attributes |
|
| Appearance Manager:
same as Appearance Gallery but with more control. |
To Apply Appearances
Through the Appearance Gallery select the required appearance, the cursor will change to a paint brush icon
In the part file; either
select a surface on the model, or
select the model name at the top of the model tree
In the assembly; either
select a part or
RMB toggle or RMB menu > select from list to select a surface
To modify Appearances Set on the Model
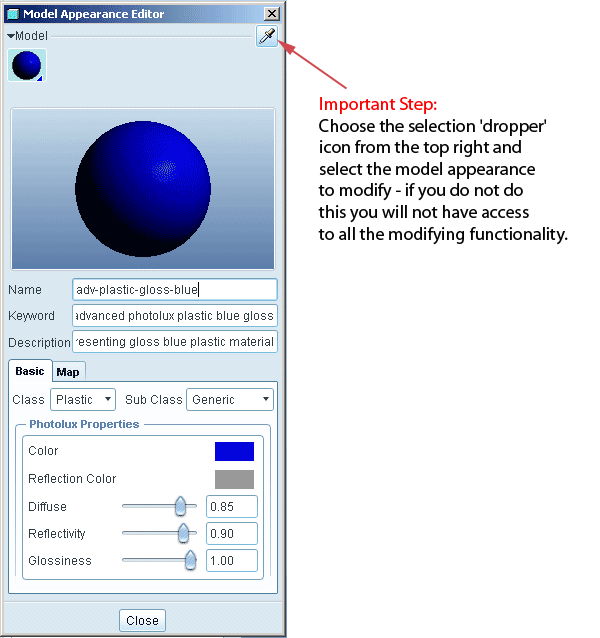
To modify appearances through the Appearance Manager they have to be included in the My Appearances list, otherwise choose Edit Model Appearances through Appearance Gallery or Appearance Manager.
![]()

All appearances will have a colour swatch and some basic surface quality setting which basically make a surface matte or gloss, more or less reflective. Most appearances are set way too glossy and reflective.
Through the Map tab you can access;
Bumpmap
CAD software generates models with a smooth surface, in reality few materials have a smooth surface and we need to consider this in a rendered image. The texture can be simply suggested with an image file but this does not consider the lighting setup in your scene, a more accurate method is to use bumpmaps - see Bumpmaps
Many of the library appearances have bumpmaps to simulate textures. These have different various options once thay are in My Appearances or are applied to the model. Still in the Appearance Editor, under the Map tab you have Bump, Color Texture and Decal.
Color Texture - apply a pixel based image image to all or selected surfaces which suggests a texture - ie. woodgrain, tiling, etc.
Decal - apply an isolated bitmap image to a surface to represent a logo or instruction label etc.
| Loughborough Design School. © Sean Kerslake 2011 |