![]() Render Setup
Render Setup
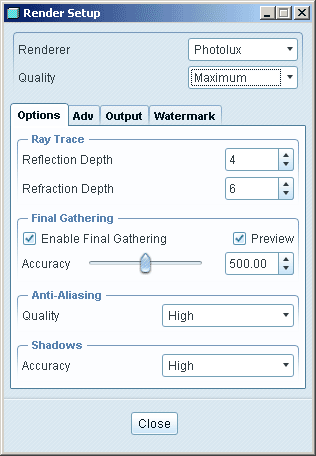
Make sure the render 'engine' is set to Photolux. Also disable the Watermark.
Increasing the render quality will significantly increase the render time, you may want to leave the setting at a lower level until you are ready for the final output.
The rendered image is by default created in the graphics area. You could take a simple screen dump of this image, otherwise, through the Output tab, Render to > [image file]. View the file immediately as the render characteristics can vary from the graphics area image.
From ProE Help;
Options
Select Ray Trace if you want to ray trace
during rendering. Photolux ray traces only portions of an
image, when required. For example, only areas with transparent or reflective
materials are ray traced. Ray tracing is particularly effective for models with
glass and other transparencies.
Under Final Gathering, click the Enable Final Gathering check box to calculate the indirect illumination in the scene. Final Gathering uses the color value from the surrounding surfaces and the background to calculate the lighting in the scene.
Adjust the slider or specify values in the adjacent box to determine the accuracy for the final gathering. Final Gathering is enabled by default if the Quality of rendering is set to High or Maximum.
Under Anti-Aliasing, select Low, Medium, High, or Max from the Quality list.
Under Shadows, set the accuracy as Low,
Medium, High or Maximum from
the Accuracy list.
Adv
Sharpen Geometric Textures - Renders geometric wall patterns with greater clarity. Use this option to create very large floors or walls. Geometric patterns include stripes and checkerboards.
Sharpen Textures at Angle - Sharpens the
image of blurred wall patterns, but may cause aliasing (jagged edges). A wall
pattern can become blurred if the angle between the pattern and the eyepoint is
too small.
| Loughborough Design School. © Sean Kerslake 2011 |