HDRi Scenes
rely on the spherical HDRi image surrounding the model to
control the lighting and generate highlights and shadows, you shouldn't need any
other lighting with this setup. Extra lighting shouldn't be an issue in a
'studio'/blank environment which does not have an image of a 'real'
internal/external environment. If you do have a a 'real' internal/external
environment then consider the direction of any additional lighting with respect
to light sources in the image eg. the sun.
Simple Scenes with no HDRi image rely on your
lighting setup for highlights and shadows.
There are lots of useful tutorials and info on the web (here or here) for considering lighting setup in rendering. The three point Key, Fill and Rim lighting setup is always a good starting point.
Distant lights are generally more effective than Spotlights when controlling shadows
 |
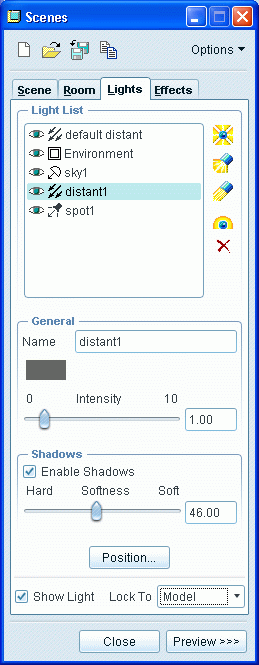
Lighting setups can be saved out to be used with other models Pick the light you wish to modify Pick the Eye icon to turn off a light The Environment light is the HDRi lighting setup - pick the image swatch under Environment Light to change the HDR image. HDR images can be found on the web - look up HDRI maps or HDR maps. studio_soft.hdr is a good basic lighting set up for general part presentation Watch the colour swatch under Name, with a new light this is set to white and is not immediately apparent. Pure white is generally to intense, pick the swatch and turn it down to a grey. Enable shadows Show the light icon in the graphics area to enable dynamic positioning Lock the light to the model so you can tumble the model with effecting the light setup |
Positioning and sizing lights
Experiment with dragging different elements of the lights in the graphics area, you can drag the light target point as well as the light itself. With spotlights you can also drag the cone angle. Many of these elements can also be adjusted in the Lights window.
| Loughborough Design School. © Sean Kerslake 2011 |