![]()
![]() Design & Tech CAD
Design & Tech CAD
Manual Positioning
Mechanisms
Animation
Animation
The Animation extension is primarily a presentation tool which outputs an Mpeg video file. In its simplest form we could look at a model from different camera angles or we could explode and reassemble the model, view from different angle and have motors driving our joints.
Over a set time period the system creates frames (x images per second) which represent a smooth transition from one ‘camera’ position to the next and, simultaneously, from one assembly state to the next. Motors may also be driving joints whilst the scene changes.
Creating a good animation relies on your creative skills not your CAD skills. Good planning and a good storyboard with plenty of fine tuning will make a good presentation video.
'Tweening'
Although a standard video is made up of 25 frames (images) per second you do not have to create each of those frames. You create Key (significant) frames and the system generates the frames between these frames.
The transition tweening process starts immediately after a key frame so if you want to hold a View (camera position) or Transparency you will need to have two instances of it in the timeline separated by the required hold time.
Do not have your assembly bouncing around the screen when your meant to be showing the mechanism characteristics.
Snapshots
A saved assembly state with or without connections disabled. You cannot disable a constraint, so if you want to disassemble non moving parts you will have to use Rigid or Weld connections which can then be disabled.
View
A camera position. Create these with the top toolbar Named View List icon in the part file. Don't confuse Snapshots with Views.

Fundamental steps (these assume you are starting with your mechanism assembly):
-
Plan Animation on paper - views/zooms/explodes/timeline/motors
-
Enter Animation module
-
Create snapshots as you disable joints and explode the assembly
-
Create views/zooms
-
Right click seconds ‘ruler’ to edit Time Domain
-
Create new Key Frame Sequence - KFS - add snapshots at appropriate time intervals
-
Add views – use the View @ Time icon
-
Add existing Servo Motors – Animation > Servo Motors – motors cannot be active if their joint is disassembled.
-
Run the Animation – use the black circular Start Animation icon
-
Adjust the elements and Run the Animation again to update it
-
Playback the Animation – use the triangular Playback icon
-
Use the Capture button to export the Animation
Snapshots
Animation module > Drag Components > Snapshots
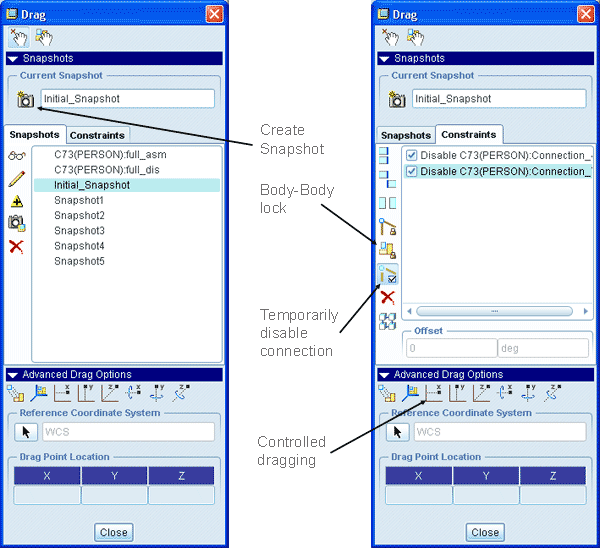
Drag components to required position > create Snapshot
You then have a collection of assembly states in your list which can be included in the KeyFrame Sequence. They can be used in any order and multiple times.
To allow you to 'explode' an assembly;
Constraints tab > Enable/Disable Connections > select the Connection to disable
Now that components can be drag apart from the assembly. The dragging will be very imprecise unless you use the Advanced Drag Options to control the direction of the component.
To add new Snapshots to an existing Keyframe Sequence;
Select the KFS > RMB Edit KFS > add Snapshot at time
Conflicts
Keyframes - don't have multiple Keyframe Sequences on one timeline as the assembly states will conflict.
Motors - motors cannot run if their parent parts are disconnected or if another motor is running a conflicting motion.
Transparencies
Consider the Tweening advice above, you will need to set an initial opaque transparency before your clear transparency. The time between the two decides how quickly the selected part becomes tranparent.
![]()
In the example above the part remains opaque till 5s then turns transparent by 6s, is held transparent till 9.5s then returns to opaque by 14s.
Display @ Time
Another method for showing hidden or internal detail is to use Style states from the part model. Use the View Manager to set parts in different display states eg. leave the internal parts Shaded and the external covers in Wireframe. Style states toggle on/off instantly so you do not need the method as described above for Transparencies to manage transitions.
Tips
-
Create animation snapshots as you gradually explode an assembly rather then fully exploding an assembly and then bringing it back together
-
A view does not contain any information about the position of the parts but simply a distance and position for viewing the scene – the parts may in any state of assembly
-
Equally, Snapshots do not contain any view information, it is simply a relative position of all the parts.
-
Consider whether you can have a particular snapshot and motor in the same place on the timeline - you cannot have a particular assembly state [snapshot] and motor controlling the position at the same time.
-
Do not have your assembly bouncing around the screen when your meant to be showing the mechanism characteristics. Repeat a view in the timeline to freeze the camera position before moving the next view.
-
Make sure the frame rate in your timeline [RMB the timeline > edit time domain] is aligned with the capture frame rate when your ready to output the .mpeg file. By default these will be different.
-
Remember the .mpg output is a screen dump. Turn of the reference geometry and spin centre, hide datum curves and increase the display quality - View > Display Settings > Model Display. Put some colour in your model and change the light setup.