![]() Design & Tech CAD
Design & Tech CAD
Views
Detailing
GA's and BOM
BOM -
Sub Asm
Explode States
Spline curves
Printing
3D Data Standards
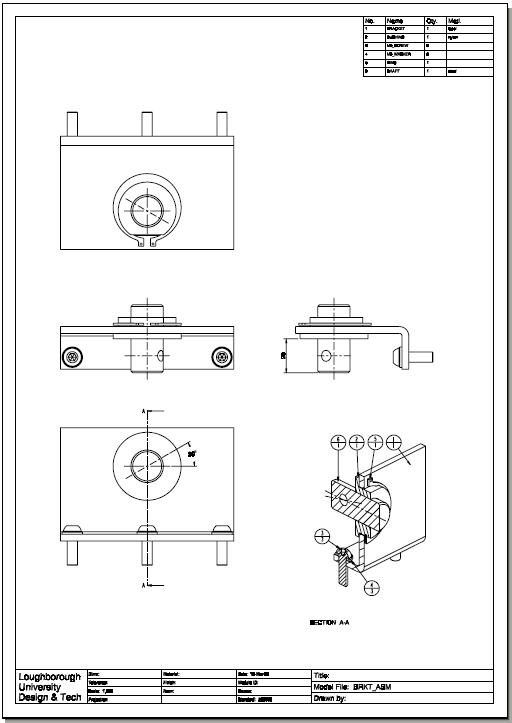
General Assembly Drawings
Create your drawing by the usual process;
New > Drawing > Empty with Format > [Browse to select appropriate Format file]
If prompted, click OK to specify No Combined State.
Remember;
-
No hidden line in views
-
show axis where needed
-
No part feature dimns in views, but...
-
.....you can have component position dimns or assembly level feature dimns
-
xsec views will give best detail of assembly interfaces
Bill of Materials - BOM
Once you have a General Assembly drawing of your assembly file you will need to create a table which lists all the parts in that assembly and some information about them. This is a Bill of Materials (BOM).
Add and define a table for the BOM
We could create a table and manually input the information describing the assembly but this would have to be updated manually and does not exploit the associativity between the assembly and the GA. We can create an associative link between the table and the assembly using a Repeat Region.
To create an automatic BOM in ProE we need to:
-
create a table
-
define a simple repeat region
-
enter the report symbols
-
update the table
-
add BOM balloons
Creating a Table to contain the BOM
Use the Insert Table icon in the top toolbar then [for a descending table in the top, right corner] from the Menu Manager choose Descending > Leftward > By Num Chars
Select the upper, right corner of the drawing sheet border as the start position of the table.
A series of numbered characters are displayed – these represent the characters in a column of text, and serve as a guide to set up the column widths, create as many columns as you need, middle click to finish. Then set the row heights - one header row and one content row, middle click to finish.
Hover over various positions around the table to select cells, columns, rows or the whole table.
Select the table and enter its properties box. Define the text justification of the columns to align in the centre of the cells.
Select the header cells individually and through the properties box [double click the cell or right click > properties] add text to define the columns.
Create a simple repeat region for the information in the BOM and define the parameters to display. This will means that the BOM table will be automatically expand downwards and be updated as parts are added.
To define the cells included in the repeat region, either:
- If only some of the cells [as above] in the row are in the repeat region;
- Table tab > Repeat Region icon > Add
- pick the start and the end cells which define the extents of the repeat region
- annoyingly, there is no indicator that the region has been created
- Done and select a cell in the Repeat Region to highlight that region
or;
- If all the cells in the row are in the repeat region:
- Hover your cursor at the end of a row until it highlights
- Select the row
- Right click > Add Repeat Region
If the process gets confused - commonly having multiple repeat regions in one place - then it is generally quicker to delete all the repeat regions and start again.
Table tab > Repeat Region icon > Remove > All Regions > Yes > select the table which contain the regions
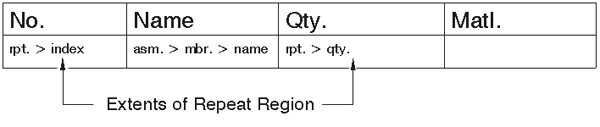
Assigned Report Symbols
Once the Repeat Region is created you need to assign the system parameters which will be entered into the repeated cells. By using the Report Symbol option in the properties window for the cells in the Repeat Region, the table can be automatically filled in.
- Double click the cell below No. and enter rpt. > index using the Report Symbol option. This will number each part in the assembly.
-
Double click the cell below Part Name and enter asm. > mbr. > name using the Report Symbol option. This will fill in the part file name
-
Double click the cell below Qty. and enter rpt. > qty. This will fill in the quantity of each part
-
To stop multiple instances of a part being displayed separately in the table: table tab > repeat region > attributes > [select the Repeat Region] > no duplicates
Use the Update Table icon in the top toolbar to update the table to show the current part information.
The Matl. column in the above example is empty at this stage as it was not included in the repeat region. You could enter the material information manually via the cell properties.
Or you can assign a material to a part file [in the part file: Edit > Setup > Material] and then using the Report Symbol asm.mbr.ptc_material.PTC_MATERIAL_NAME this can be included in the repeat region. In the labs you will find the materials library in C:\PTC
Add BOM balloons to the drawing.
- Table tab > BOM Balloon > Set Region [select the Repeat Region] > Simple or With Qty
- Create Balloon > Show > By View and then select the appropriate view of the assembly where you want to place the balloon labels.
Reposition the balloons appropriately and change the attachment locations.
- Select a balloon and move it using the control handles
- Modify the attachment point of a balloon through RMB menu > Edit Attachment
- It is generally clearer if the attachment is to a surface rather than an edge
Make sure it is obvious what the balloon arrows are indicating