ProE Administration
Changing Units System
Data transfer
Rapid prototyping
Laser cutting
Waterjet cutting
Running ProE on your personal computer
*** After installation but before you start using your own installation of Creo you need to change it's configuration files - SEE HERE ***
Hardware Recommendations for Creo Elements
Pro 5.0
It is not a course requirement to have your own
computer and CAD software, there is adequate access to PC labs across
campus to complete your coursework. But if you choose to:
Universities Edition – the version used in the computer labs in
the Department - this version uses a network license
and therefore MAY be usable in halls depending on your location.
Student Edition – the version which can be purchased for
standalone home use and does not require a network license.
Spec that will run Creo will
run most other 3D software – modelling or rendering –
and will run 2D bitmap and vector graphics software. Talk to year 2 and
year 3 students about what they would recommend.
Laptop or Desktop?
There is generally no need to bring a laptop into
the Department. So unless you really need the extra
portability and compact size then desktop PCs will give you better value
for money and adaptability.
LCD screens and compact towers give lots of space flexibility. You can’t use CAD software without a 3 button mouse [scroll wheels double as middle button].
If you are going for a laptop [or more
accurately a ‘mobile desktop’ when it comes to something that will run
3D software] then make sure its right – laptop are very difficult and
expensive to upgrade.
Recommended spec:
Operating System: Windows XP or
higher
CPU/processor
speed: 2.0GHz
Available
hard disk space: 1.5 Gb
RAM memory: 1Gb [recommended: as much as you can afford!]
Graphics card: 128Mb OpenGL
compliant
The quality and manufacturer of your graphics card is the main hardware issue - Pro/E is unlikely to run on systems that have only ‘on board’ graphics. A separate graphics card with a minimum of 64Mb memory [again, recommended is as much as you can afford!] from nVidea, ATI, PNY is likely to be OK – no guarantees.
Macs – people are running ProE on Macs with Windows emulators – ask around 2nd/3rd years and look on the Web
Educational Edition
The version of Creo installed on any of the networked lab machines is referred to as the Educational Edition. It is the version licensed to selected universities which has a full set of Creo modules.
This version can be installed and run on your personal computer if you are in halls and your computer is on the university network. Installation disks can be loaned, free of charge, from the Departmental store. The software uses a network license, therefore it will not run if you unplug your computer from the network.
Computing services can give you information on setting up your computer to connect to the network.
** Instructions for installing the Educational Edition can be found here **
Student Edition
You can also purchase a version of Creo which is independently licensed and does not need your computer to be connected to the network. This is referred to as the Student Edition. Although the student version has a limited number of modules, those which it does have allow you to do advanced modelling.
This version can be purchased from ptc.com
Assistance for Student Edition installation (.pdf) be found on the disks along with an assistance email address.
Converting Units
If you started a new ProE file without the appropriate configuration file active then it is likely that you part will be in the factory default units - inches. This doesn't make an awful lot of difference whilst your modelling [although there are accuracy/tolerance issues] the main issue for this is that in reality your part will be 25.4 times bigger than it should be!
If you bring it into an assembly of parts which are in millimetres then then issue will be more apparent - your parts will not fit together.
This issue is applicable to all types of files, not just .prt files
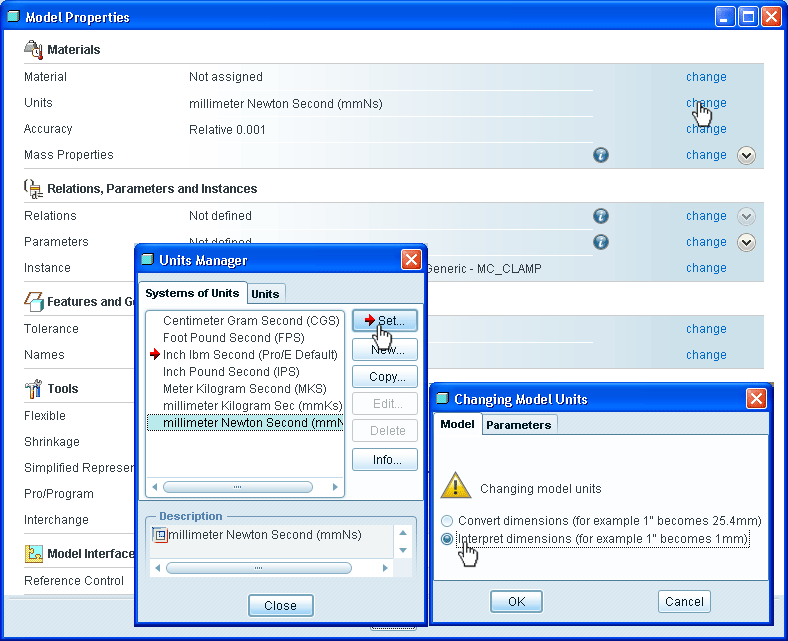
To change the units of a ProE file:
Edit > Setup > Units

The red arrow shows the current units system. Highlighted is the system you wish to change to.
Understand and make the right choice in the Changing Model Units window. It is most likely you want the second option which will effectively scale your model.
