![]() Design & Tech CAD
Design & Tech CAD
Project Link
We shall be using the Project Link application within Windchill (WC) with the data stored on the WC server, as the name suggests, this application manages projects.
Project - self explanatory - a project
Folder - self explanatory again - folders in a Project
Organisation - used to organise project teams and give permissions to projects, folders and files.
Team - members of a Project
Check Out - when a file is checked out from the server and loaded to the Workspace you can edit and save it. Whilst it is checked out others may open and view it (use it in associated assemblies etc.) but they cannot edit it.
Workspace - CAD files need to be in your Workspace to be either viewed or viewed and edited in Creo. Files do not have to be Checked Out to view them.
Check In - check in a file when you have finished editing it to allow others to check it out and edit it
Naming Conventions
You cannot have two files in the database on the server with the same name, regardless of whether they are in separate folders or projects.
The server represents an organisation, any part created by that organisation is unique and may be used in any project across the organisation.
To avoid conflicts, it is suggested you add your user ID (cdabc, dsxyz) as a prefix to an file names you create.
To rename a CAD file, first consider its associativity to any other files - parts to assemblies, drawings to parts, etc. Any parent/child links between files need to be updated with any name change:
- open the file to be renamed
- open any files which are linked to it
- File > Rename
The file will be renamed and any links will be changed to reflect the name change.
Access via the Web
Projects can be managed and non CAD files accessed via a web browser
Link: https://www.windchilleducation.eu/Windchill
DO NOT try and work on CAD files via the standalone web interface, access CAD files through the Creo embedded browser and file management.
Access via Creo
To modify CAD files you need to access the server via Creo
| HERE | To Access via lab PCs |
| HERE | To Access via non lab PCs |
| HERE | To Disconnect from the server and work locally |
Accessing CAD files
| HERE | To upload existing parts and assemblies to the server |
| HERE | To Check Out and add to Workspace, to Check In to server |
Navigation
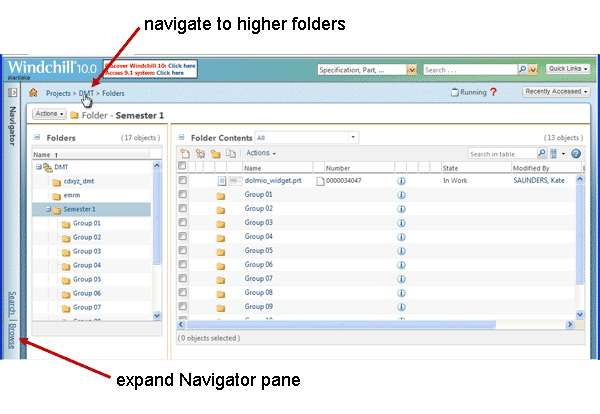
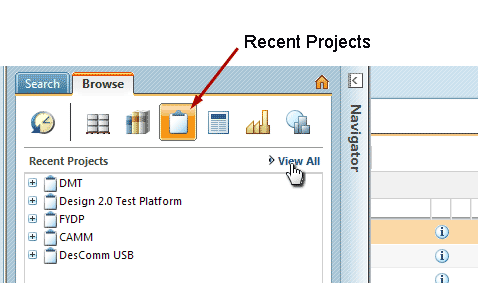
Use the Browse link to expand the Navigator pane.
Choose Recent Projects > View All
Use the current location 'breadcrumb trail' - top left next to the Home icon - to navigate to higher level folders
Expand (
Creating folders in a project
As a member of a project you can create your own folders and organise your work accordingly. Whilst uploading local files to the server you can create a folder - see above or HERE.
Permissions
By default the Administrator and the Project Managers will have full rights to all folders.
Select the folder in the Folders list, RMB > Manage Security
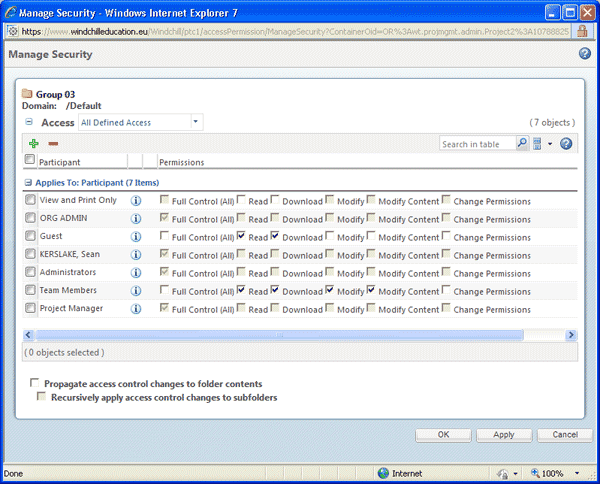
Choose the
Search* for Participants > Add them to the Participant list > OK.
* put the full name in the Search box or Use a wildcard *, strangely the wildcard searches on the first name but lists by family name, so if you wanted to find Kevin Badni you would type k* and his name would be listed as BADNI, Kevin.
*** Watch the Manage Security window does not get hidden behind the main Creo window - check your Taskbar
Select the security level needed for those people in the Permissions list > OK
By default all Team members have access to a new folder (see image above) - typically the whole year group. Add yourself (and your group members if appropriate) to the participants list then you can give yourself Full Control but uncheck all access from Team members.