![]() Design & Tech CAD
Design & Tech CAD
Reference geometry
Variable Section Sweep
Layers & visibility
Adv. Rounds
Mathematical control
Advanced Patterns
Draft & Split plane Trim
Geometry from 2D graphics
Model analysis
Accuracy
Skeleton based surfacing:
Model Analysis
Section Curvature
Splines
Boundary Blend
Construction and manipulation
Trim, Merge & Solidify
3sided surfaces
Offset Surfaces
Reference geometry
These features do not form part of the model but are created in order to establish a reference for model features where no suitable reference exists - remember, everything has to be ‘fixed’ in our 3D space.
Degrees of Freedom (DoF) – the freedom to move in a direction which has not been constrained – fixed to another entity. Can the entity be moved in any direction or rotated?
The reference geometry you create also has to referenced in space such that it has no DoF. You will not be allowed to complete the feature until all the DoF have been resolved – until it has been fully constrained. How many references or constraints are needed to place your new reference feature is dependent on what sort of geometry it is and what you are constraining it to.
![]() Planes:
Planes:
parallel offset from another plane/surface
normal to a plane/surface
through an axis/line/edge/point
angular offset from another plane [must be combined with through axis/line/edge]
Points:
![]() Constrained to other references:
Constrained to other references:
On a surface/plane and referenced to other entities, ie. two other surfaces
On an edge/line relative to the end of the edge, line
On an axis relative to another reference
![]() Offset from a
csys in x,y and z
Offset from a
csys in x,y and z
![]() Sketched on a
surface/plane
Sketched on a
surface/plane
If you are creating multiple points then include them all in one feature if possible – this can result in a significantly shorter and tidier model tree.
![]() Axis:
Axis:
Through a point/vertex
Normal to a surface [doesn’t have to be planar] or plane
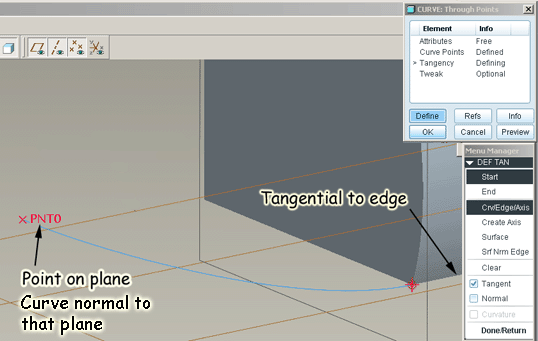
Curves:
![]() Sketched on a surface/plane
Sketched on a surface/plane
Between two or more points - consider end conditions – tangent, normal etc.
Attribute > Quilt/srf - once a curve between points has been created it placement can be changed from free [the shortest, smoothest path between the points] to lying on a surface. The points will need to be on the surface before this can be applied.
Tangency end conditions - if the curve is referenced through its start point to another entity [ie. it starts from the vertex of an edge or from a point on a surface] a normal, tangential or curvature continuous relation can be created.
Sweep curve [Coach example here]. A curve between multiple points can be given the condition ‘single radius’. The points are then joined with straight lines and then a fillet [round] is created an the junctions – ie. consider the sweep path for a bent tubular steel chair

Intersect – create curve at the intersection of two preselected entities – Two sketched curves, two surfaces, a plane and a surface.
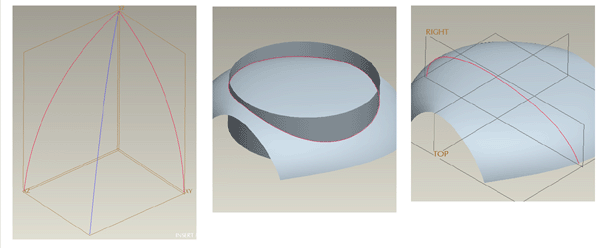
Project – an existing curve or a sketch can be projected normal to a selected plane onto a surface
Wrap – whereas a projected curve will be distorted if it is created on a non planar surface, a wrapped curve will not be - it will form across a surface such that all the curve lengths are unchanged.
Note: you cannot wrap a curve onto a surface which is curved in two directions - only cylinders.
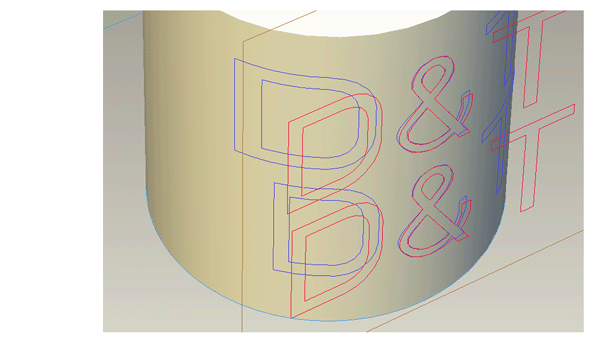
To Wrap onto complex surfaces
If you need to apply some curves to a surface with curvature in two directions whilst minimising distortion you could:
-
create a cylinder which approximates in orientation and diameter to the target surface
-
create your sketch and Wrap onto this cylinder
-
create a sketch from the wrapped curves - Sketch > Copy Edge tool
-
use the appropriately distorted sketch in a Project or Offset surface process onto the target surface
If your target surface is tending to the spherical you will still get distortion in one direction, make sure you align the cylinder with the direction of least distortion.
Offset Curves
To create clearance between assembled parts which may be the result of a Top Down Modelling (see Assemblies) approach, you may need to offset edges or curves.
Note: you can Offset curves or surface edges, you cannot offset solid edges. Copy the surface edge first (select, Ctrl C, Ctrl V) and offset the copy
The Offset tool is selection driven - select the geometry to enable the tool
To select solid edge: select solid, select surface, select edge
To select surface edge: select surface, select edge.
Edit > Offset