Reference geometry
Variable Section Sweep
Layers & visibility
Adv. Rounds
Mathematical control
Advanced Patterns
Draft & Split plane Trim
Geometry from 2D graphics
Model analysis
Accuracy
Skeleton based surfacing:
Model Analysis
Section Curvature
Splines
Boundary Blend
Construction and manipulation
Trim, Merge & Solidify
3sided surfaces
Offset Surfaces
Merging and Trimming Surfaces
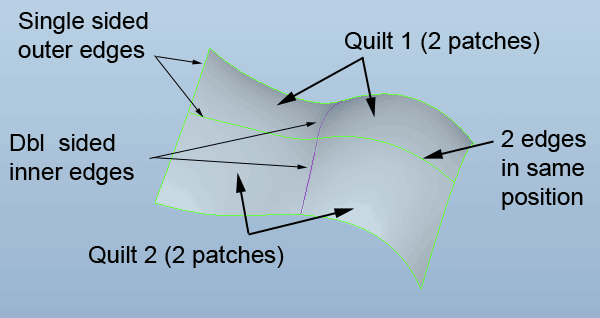
If you create separate surface features with a common boundary it may look like there is a single boundary edge, there is in fact two edges occupying the same position. These are two single sided edges - a surface only resides on one side of the edge.
In the image below there are two surface features which have two patches each. The green edges are single sided - a patch on only one side. The purple edges are double sided - a patch on both sides.
The green horizontal edge across the middle is in fact two single sided edges in the same place.

- One surface can be used to trim another
- A surface can be trimmed using a curve on the surface
- Two surfaces can be merged, removing any overlapping sections
![]() Merge
Merge
-
Ctrl select two surface quilts
-
Merge
-
Ctrl select further quilts if needed whilst in the feature - you can Merge more than two quilts at a time
Depending on the nature of the chosen geometry and how it intersects, the Dashboard direction arrows will flip which patches are joined or trimmed.
![]() Trim
Trim
A quilt can only be trimmed if there is suitable geometry interacting with it - a second surface or datum plane intersecting it, a curve on the surface.
Select the surface > Trim > select the trimming geometry
If you use the flip direction arrow on the dashboard rather than in the graphics area, you can toggle to trim side A, side B or to keep both sides as separate quilts. You can also use this toggle option when using an Extrude to cut a surface.
![]() Surface Fillets
Surface Fillets
A fillet can only be formed between two surface patches if the patches are part of the same quilt and not if they are separate features. Merge the two features then fillet the boundary. Select the edge to be filleted.
![]() Solidify
Solidify
The Solidify command will perform various operations dependent of the selected geometry.
A number of surfaces enclosing a
volume can be used to form a solid - all the individual surfaces need to be merged as a
quilt first. An 'open' surface volume can also be closed by the intersection of
a solid which 'closes' the volume.
A surface can be used as a cutting plane through a solid - make sure you select
the cut option in the dashboard.
Thicken
![]()
In a similar way to a Shell, offset surfaces can be created from a quilt to produce a solid.
The Thicken process will fail if there is geometry the system cannot resolve - small, narrow, high curvature surfaces are classics to fail.
Use the preview button to force the system to try and build the geometry, if elements fail it may then give you the option to exclude the failed surfaces which you can handle manually.
