![]() Design & Tech CAD
Design & Tech CAD
Introduction to 3D CAD modelling
Design Intent
Sketching
Intro to Creo through
the Extrude feature
Editing
the Model
Managing the Model
Robust Modelling
Revolve
Blend
Sweep
Swept Blend
Engineering Features
Edit Features
Reference Geometry
Helical Sweep
Blend - Swept Blend
Key Terms:
Sections
Vertices
Blend vertex
Start point
Trajectory
DO NOT use Insert > Blend to produce a blend. This is a legacy feature which uses the Menu Manager interface. The Swept Blend uses the Dashboard interface and is therefore quicker and simpler to set up and modify.
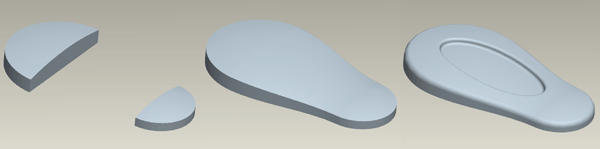
The blend function in Creo is commonly known as a loft [originating from boat building] in generic CAD terms. In its simplest form we would have multiple parallel 2D sections which are spaced apart from each other. The CAD system creates a volume (solid, cut or surface) by filling in the gaps between these cross sections.
There are two main issues which need addressing when creating a blend feature; number of vertices in each section and alignment of the start points.
Number of Vertices
In the example below, a circle has been blended to a hexagon. The lines which join the two sections and represent the volume of material to be created are joined from vertices [points where curves meet] on one section to vertices on the next.
But if, as in the above left example, there are an different number of vertex's in the two sections [a circle has no vertex's!] then the systems needs to be told where to connect the points to. In this case the circle has been split into six arcs.
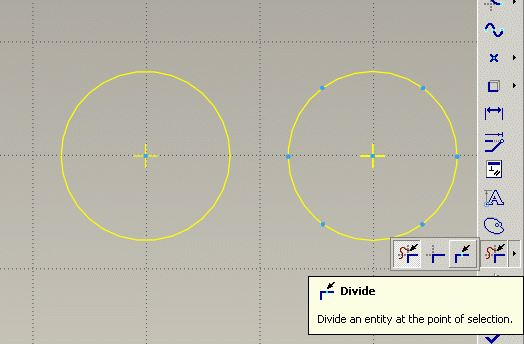
We could have split the circle into less segments and created a blend vertex - essentially a point on top of a point which would allow us to connect two points from the hexagon to one point on the segmented circle. This would give a very different form.
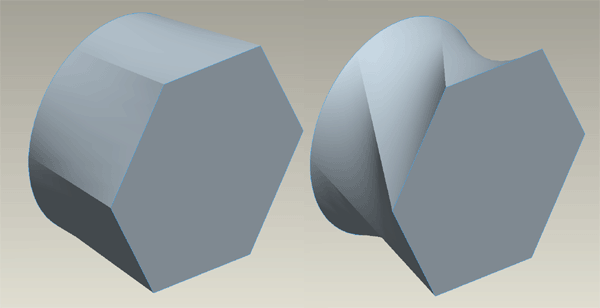
Start Points
In each of the sections one of the vertices is designated as the start point. These are the first points to be joined between the sections, the system then moves logically around the sections joining each point in turn.
Where your start points are placed decides on the final form. This can be seen in the two images above where the start point has been moved in the second model giving a very different form.
Decisions concerning
numbers of vertex's and start point positions is very much based
on
your Design Intent.
Functionality
Common Considerations:
- As with any blend, each cross section must have the same number of vertices (points), or in other words, be made up of the same number of lines. This defines how one section is connected to another.
- Try and plan the feature so that the section are not swept around the inside of any curves in the trajectory - problems can occur if the section has to be ‘compressed’ inside a tight curve.
- The cross sections and the trajectory can be sketched or selected from existing edges or reference geometry - selecting existing geometry is more robust.
External Sketches
Creating your trajectory and sections as separate features is a more efficient strategy as you will not lose your construction geometry if the features is deleted
Pick the Swept
Blend
![]() icon from the right toolbar.
icon from the right toolbar.
![]()
Solid or surface? This feature defaults to surface, so pick solid if that is what you want
Watch a video HERE
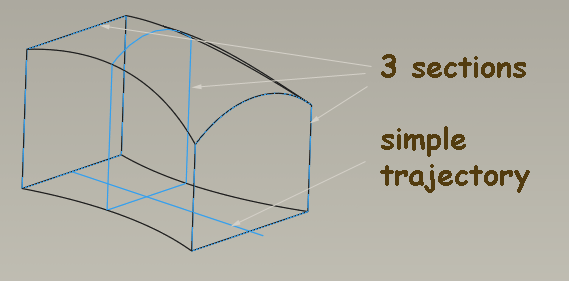
Trajectory
The first element you need to select is the Trajectory
Although to produce a simple Blend the Swept Blend needs a trajectory, it could be as simple as a straight line or an existing edge.
The blend will only be created as long as the sections are within the extents of the trajectory - make sure the trajectory starts before the first and extends past the last section
Using the right click menu for options is usually quicker.
Select a sketch or edge[s] to define the trajectory.
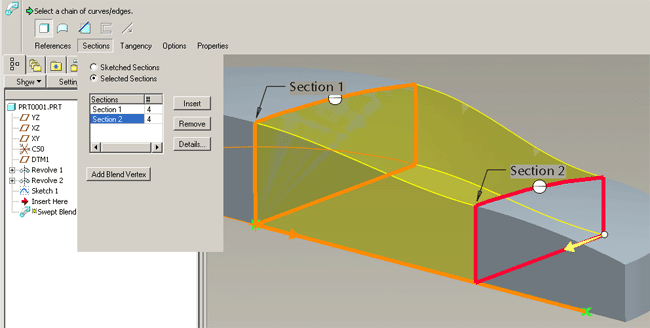
Sections
Through the right click menu or under the Sections option change to Selected Sections
Pick your first sketch, then pick Insert [right click menu or Sections option again] to add to the list and then pick the next sketch along the trajectory.
Continue to pick Insert and select the relevant sketch for all your sections.
If your section is made
up of multiple edge elements then you will have to create a 'chain' of
edges.
DO NOT use CRTL to pick multiple solid edges as
this will select multiple sections.
To create a chain of edges:
-
Select the first edge
-
Press and hold SHIFT
-
Pick the first selected edge again - this changes the selection method to chain
-
Still holding SHIFT, select the other edges which make up the chain
If the previewed solid is twisted because the start points are not aligned, simply drag the start point marker to the appropriate vertex.
Blend Vertex
You may have a situation where you have an unequal number of vertices but its not appropriate to split one of the curves because you want multiple points in one section to blend to a single point in the next - imagine a square blending to a triangle. In this case you need to add a Blend Vertex - basically a point on a point to increase the vertex count.
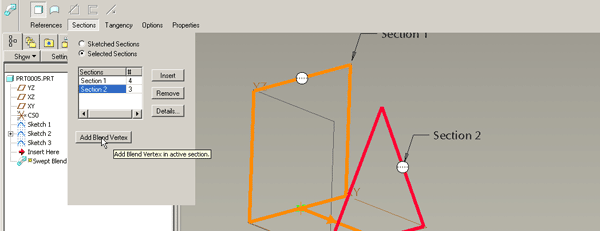
Continue the process as before. When you come to the section which needs a blend vertex use the Add Blend Vertex button in the Sections menu. The extra point will show as a white square, drag this to the appropriate vertex.
You CANNOT have a blend vertex on the Start Point, if they coincide, move the start point on your sections
Tangent end conditions
If the feature is joined to a suitable geometry you can use the end condition markers to set tangency. In the below example some simple control surfaces were created prior to the swept blend feature to enable setting tangency.

Click image to enlarge