![]() Design & Tech CAD
Design & Tech CAD
Introduction to 3D CAD modelling
Design Intent
Sketching
Intro to Creo through
the Extrude feature
Editing
the Model
Managing the Model
Robust Modelling
Revolve
Blend
Sweep
Swept Blend
Engineering Features
Edit Features
Reference Geometry
Helical Sweep
Engineering Features
![]() Round
or Fillet
Round
or Fillet
![]() Chamfer
Chamfer
![]() Hole
Hole
![]() Shell
Shell
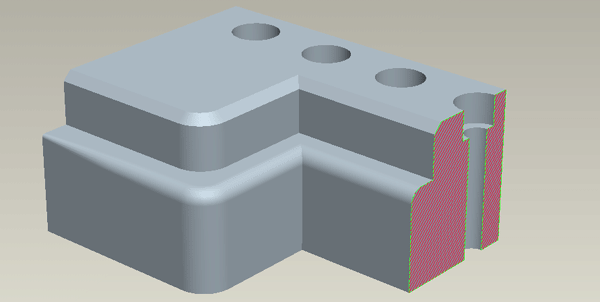
These are features which modify existing solid material.
![]() Round - Fillet
Round - Fillet
Removes material to create a radius on a chain of edges. This could be a single radius along the length of the chain or the radius could vary in size along the chain. The system automatically creates a chain whilst there is a tangent relationship between edge endpoints. In the example below only one edge was selected but a chain is formed of the three tangential edges.
Organise similar or consecutive fillets under one feature where possible rather than having a long list of fillet features in your model tree - a neat concise model tree gives a more easily managed model.
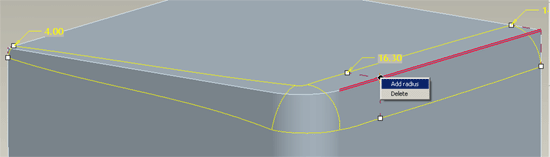
Hold the Ctrl key to 'collect' the edges you want to fillet. Use the right click menus on the drag handles [as above] for different options. Make sure you experiment with the dashboard options.
Rounds can sometimes fail – particularly at points where multiple edges join without tangency. Try and visualise what you are asking the system to do.
Auto Round Tool
Insert > Auto Round
This tool will allow you fillet all [possible] edges - concave, convex or both. Once all are selected you can Exclude edges.
Caution - fillets add a lot to the regeneration time and file size. Sometimes, it is worth suppressing fillets whilst developing the rest of the model and then resuming them when finished.
![]() Chamfer
Chamfer
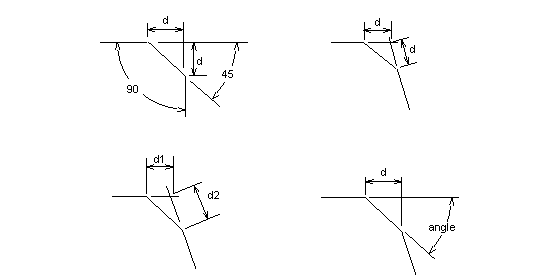
This is similar to a round except that it creates a flat rather than a radius. By default the flat is created an equal distance from the edge into the two adjacent surfaces. This can be changed to be unequal using distances or a distance and angle.
As with fillets, organise similar or consecutive chamfers under one feature where possible rather than having a long list of fillet features in your model tree.
![]() Hole
Hole
As the name suggests, this function creates a hole. At its simplest this can be a parallel, flat bottomed hole. Or it could be a hole with a custom profile driven by a sketch. Or it could be a ‘standard’ hole whose profile is specified by a standards agency such as ISO or ANSI.
As with any other feature, the hole must be robustly referenced. It must be placed on a planer surface or datum plane and its position on that entity must be fully explained from appropriate references.
Placement surface - the surface you are going to 'drill' the hole into can be either planar, cylindrical or conical. The hole axis will be normal to this surface.
If the surface you want to 'drill' into is not planar, cylindrical or conical [ie. a complex 3D surface] or if the hole needs to be at an angle to the placement surface then you will need to create a datum plane in an appropriate orientation to use as the placement surface. For a complex 3D surface you could also use a point on the surface but the hole would then always be normal to the surface at the point.
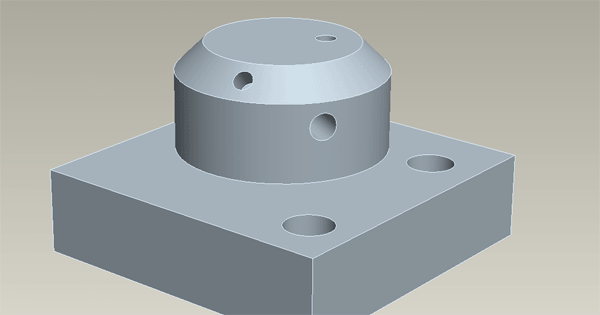
Primary reference - this is not always the placement surface. This is the most significant reference in placing the hole. It could be a planar, cylindrical or conical surface, or it could be an axis or a point. Depending on what you choose will dictate what other references are required.
Offset References - defining the position of the axis on the placement surface - access via right click menu or Placement drop down. Different types of positioning references will be required according to what type of placement reference you have chosen. Planar surfaces and datum planes are common picks for this references.
Linear - dimension from X and Y references - these must be perpendicular to the primary reference. Surface/plane as placement reference
Coaxial - the hole axis is aligned with an existing axis. Crtl pick axis and surface/plane in placement box.
Radial/Diameter - the hole axis is placed at a radius/diameter from a reference axis. It also needs an angular dimension 'around' the axis from a chosen plane which is parallel to the hole axis. Surface/plane as placement reference, change Type to Radial/Diameter, axis and perpendicular angle surface/plane as Offset references.
Combinations:
Planar placement reference - positional references could be linear, coaxial, or radial/diameter.
Cylindrical placement reference - this will require a linear reference to place the hole along the cylinder and a plane parallel to the cylinder axis to give an angular reference.
Conical - this requires the same references as a cylindrically placed hole. The linear reference will translate the the distance along the angular surface.
Point - if a point is chosen as the primary reference then the hole axis will be normal to the surface the point resides on.
![]() Shell
Shell
This feature removes the internal volume from a solid leaving a specified wall thickness. Selected surfaces of the solid can be removed to create an opening to the internal void or it can be left as a closed shell.
The shell feature generates offset surfaces for all solid surfaces which exist at that point in the build process, carefully plan the position of the shell - geometry which does not need to be shelled must exist after the shell process. There should generally only be one shell feature in a model otherwise you will be shelling the shell!
Ctrl select the surfaces you wish to remove to 'open' the volume, you do not have to select any surfaces, you may want a closed shell which may be opened up later by other features.
Shells can be a problematic feature if the solid has complex geometry. Sometimes you will have to think of a work around to achieve your design intent.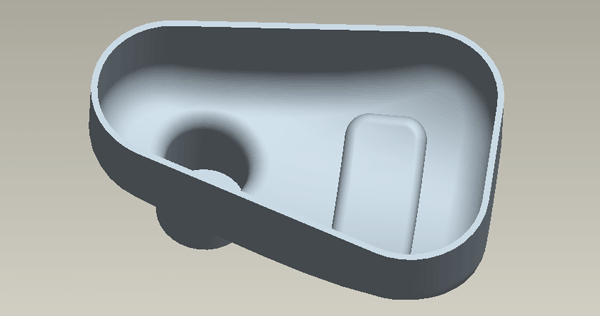
Additional useful Engineering Feature:
Draft feature
The draft feature is commonly understood with respect to mould tools. It will add or subtract material to a group of edges to the set draft angle.
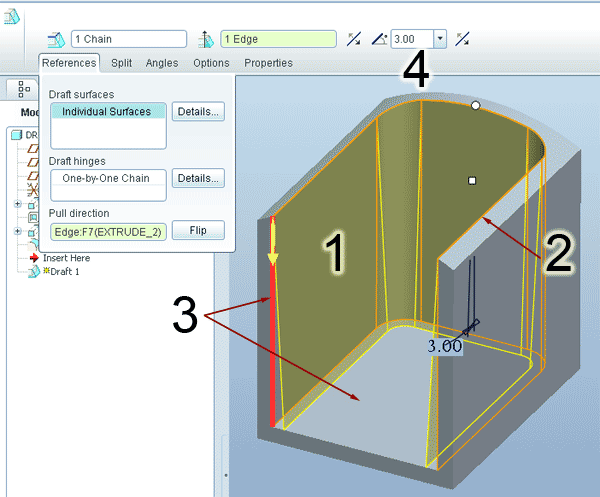
4 elements:
1. Draft surfaces - those surfaces to which material will be added or subtracted
2. Draft hinges - the edges about which the surfaces will rotate - these do not have to be adjacent to the draft surfaces
3. Pull direction - in the above scenario, either the chosen edge or the bottom surface indicates the zero degrees vector - vertical
4. Draft angle