Procedure Summary
Machining Considerations
Preparation
Tooling
Mill Geometry
Setting up a machining process
Volume Mill
Local Mill
Trajectory Milling
Holemaking
Engraving
Process Manager
Tool Movement Simulation
Post Processing
CNC Procedure Sheet
CNC Machining Tool Parameters
3d Machining
Unimatic Router
ProPlastic Advisor
DO NOT drill any holes deeper than 10mm - there is a likelihood that the drill flutes will become clogged and the drill break. If your hole needs to be deeper than 10mm deep, then drill a 10mm pilot hole which can be completed in the machine shop.
Sequence setup
Select the Standard Drilling icon from the top toolbar
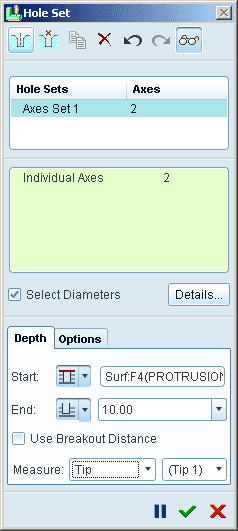
The default setting is to select axis or cylindrical surfaces to define hole positions, this becomes the Hole Set
Next set the hole depth by specifying the start and end.
DO NOT use the the default Auto setting as this is likely to drill through the workpiece. Ensure that any depths are Blind (to a defined depth) and are set relative to the start surface of the hole set and the Tip of the drill
DO NOT drill through the stock material.
DO NOT use a negative figure for the hole depth – drill can only drill downwards so the direction does not need to be defined and you do not have to specify the depth as a Z coordinate.
.

Hole drilling order
Under the Options tab you can choose which hole is to be drilled first. The order of machining the holes can also be influenced by the SCAN_TYPE parameter value.
