Procedure Summary
Machining Considerations
Preparation
Tooling
Mill Geometry
Setting up a machining process
Volume Mill
Local Mill
Trajectory Milling
Holemaking
Engraving
Process Manager
Tool Movement Simulation
Post Processing
CNC Procedure Sheet
CNC Machining Tool Parameters
3d Machining
Unimatic Router
ProPlastic Advisor
* If your machining complex line work such as a logo then use the Engraving sequence
Trajectory Milling will follow a defined path which is selected from
edges or curves within your reference model. The shape of
the tool, its position relative to the trajectory and
z depth relative
to the machine zero define the cavity formed.
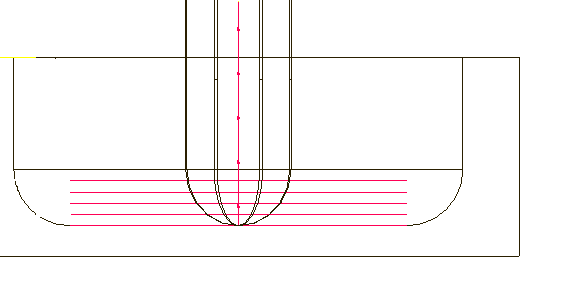
Important - It is unlikely your cutter can take out all the material in one pass, make sure you consider the settings below to slice the total depth. Ball nose cutters in particular will need more than one pass to give a good surface finish
Start a Sequence
Choose the Trajectory Mill icon from the top toolbar
Choose 3 Axis > Done
Check Tool, Parameters and Tool Motions
Setup the Tool.
Set up the usual Parameters.
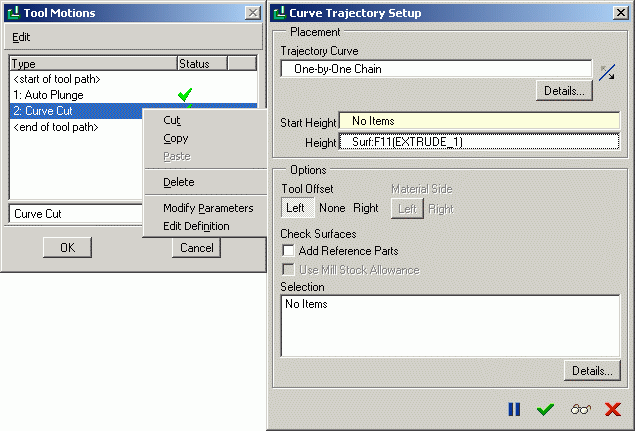
OK will take you to the Tool Motions window. Choose Insert to enter the Curve Trajectory Setup window.

Select the curves or edges which define the trajectory - remember to use the chain selection method [shift]
DO NOT [generally] specify a Start Height
The Height parameter specifies the total depth of cut – pick a surface or datum plane.
Through Tool Offset set the tool to run on the trajectory [None] or offset by the radius to the left or right.
OK to return to the tool motions window
Redefining the trajectory
Choose the Curve Cut element in the Tool Motions window, right click, Edit Definition to return to the Curve Trajectory Setup window
To add further chains to the same sequence
Don't create separate sequences for a group of trajectories which have the same cutter, depth and parameters.
Select <end of tool path> in the Tool Motions window
Select Insert again to return to the Curve Trajectory Setup window - repeat above
Slicing the Total Depth

DO NOT remove the material in a single cut - you need to slice the total depth into slices - see above image.
Set up the parameters STEP_DEPTH and NUMBER_CUTS [number of cuts] - this slices the total depth from the bottom up. Once the tool path is running you may have to fine tune these values. Choose All rather than Basic in the displayed list of Parameters.
Zig Zag
Rather than returning to the start of the trajectory for each slice, set the parameter CUT TYPE to ZIG ZAG - this will force the cutter to cut in both directions. Choose All rather than Basic in the displayed list of Parameters.
Remember the Manufacturing
parameter tree icon
![]() in the top toolbar when fine tuning the sequence.
in the top toolbar when fine tuning the sequence.
