![]() Design & Tech CAD
Design & Tech CAD
Procedure Summary
Machining Considerations
Preparation
Tooling
Mill Geometry
Setting up a machining process
Volume Mill
Local Mill
Trajectory Milling
Holemaking
Engraving
Process Manager
Tool Movement Simulation
Post Processing
CNC Procedure Sheet
CNC Machining Tool Parameters
3d Machining
Unimatic Router
ProPlastic Advisor
Preparation
*** Good file management is absolutely critical at all stages of the project, a lot of associated file will be created automatically which need to be kept together in a separate project folder ***
Reference Model
You should have a part file of your tool – this is your Reference Model - what you going to create. We use the geometry in this model to guide the tool path - edges, curves, surfaces, volumes, holes, etc. - this is dependent on which mill geometry or sequence type you are generating. It may not be an exact image and may have to be adapted to produce the desired geometry.
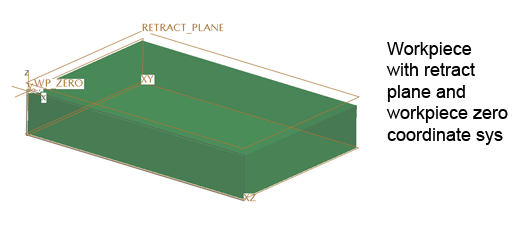
Workpiece - the stock material
When you open a manufacturing file a default Workpiece is automatically assembled.
Important concept: The Workpiece defines the extents of the stock material (as this could be larger than the reference model) and therefore where the machine will create tool movement data.
You will need to resize the default Workpiece to represent your stock material.
Open a new Manufacturing file
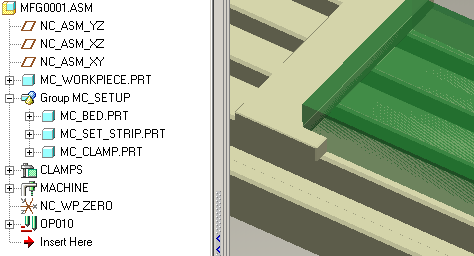
Default files
The above screenshot of the model tree in a new Manufacturing file shows that there are a number of files automatically created and assembled - it is important these files stay together in your project folder.
You will not find unique manufacturing file in the working directory. All the manufacturing info is saved in the Assembly file
The four part files represent the physical setup of the machine prior to machining. The last three files allow you to visualise any tool collision issues - they do not influence the machining process. The Group MC_SETUP can be hidden once considered - save your layer status to keep items hidden when a file is reopened.

Assemble Reference Model
Next assemble your reference model in the correct position relative to the Workpiece.
Use the
![]() Assemble Reference Model icon in the right toolbar
Assemble Reference Model icon in the right toolbar
DO NOT use Insert > Component > Assemble
DO NOT drag and drop your reference model into the assembly
File Management
-
[project].asm - assembles your workpiece, clamps and reference model
-
mc_workpiece.prt - the default workpiece - 150 x 100 x 25mm
-
mc_bed.prt - the machine bed
-
mc_set_strip.prt - xy the datum setting strip
-
mc_clamp.prt - the workpiece clamp
-
[reference model].prt - reference model
By this stage you have six files which are critical to your manufacturing file reopening correctly.
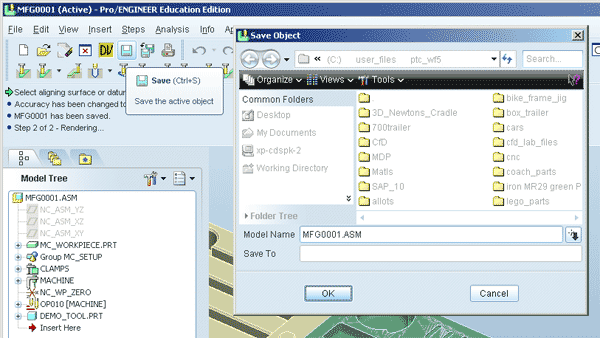
Once you have finished your first session with your manufacturing files, it is critical that you move all these file to a project folder.
When you return to your project:
- move the folder to the Working Directory
- RMB on the folder in Creo and set it as your working directory
- when finished, move the folder off the hard drive and overwrite the existing folder
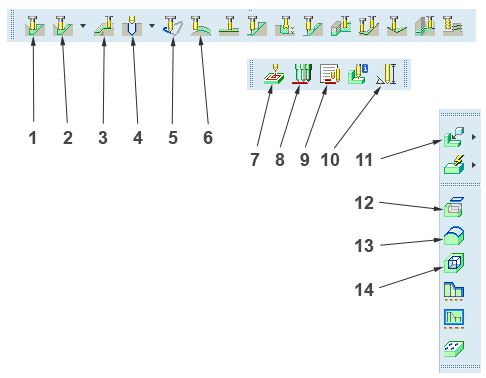
Interface
-
Volume Roughing
-
Previous Step - Local Milling - 'rest mill'
-
Trajectory Mill
-
Standard Drilling
-
Engraving
-
Surface Mill
-
Sequence Parameters
-
Cutter Path Simulation
-
Process Manager
-
Tool Library
-
Insert Workpiece
-
Create Mill Window
-
Create Mill Surface
-
Create Mill Volume